Stefan Winkler's Blog
This is part two of an extended version of a talk I gave at TheiaCon 2025. That talk covered my experiences with Ollama and Theia AI in the previous months. In part one I provided an overview of Ollama and how to use it to drive Theia AI agents, and presented the results of my experiments with different local large language models.
In this part, I will draw conclusions from these results and provide a look into the future of local LLM usage.
Considerations Regarding Performance
The experiment described in part one of this article showed that working with local LLMs is already possible, but still limited due to relatively slow performance.
Technical Measures: Context
The first observation is that the LLM is becoming slower as the context grows. The reason is that the LLM needs to parse the entire context for each message. At the same time, a too small context window leads to the LLM forgetting parts of the conversation. In fact, as soon as the context window is filled, the LLM engine will start discarding the first messages in the conversation, while retaining the system prompt. So, if you experience that an agent seems to forget the initial instructions you gave it in the chat, this means most likely that the context window is exceeded. In this case the agent might become unusable, so it is a good idea to use a context window that is large enough to fit the system prompt, the instructions, and the tool calls during processing. On the other hand, at a certain point in long conversations or reasoning chains, the context can become so large that each message takes more than a minute to process.
Consequently, as users, we need to develop an intuition for the necessary context length–long enough for the task, but not too excessive.
Also, it is a good idea to reduce the necessary context by
- adding paths in the workspace to the context beforehand, so that instead of letting the agent browse and search the workspace for the files to modify via tool calls, we already provide that information. In my experiments, this reduced token consumption from about 60,000 tokens to about 20,000 for the bug analysis task. (Plus, this also speeds up the analysis process as a whole, because the initial steps of searching and browsing the workspace do not need to be performed by the agent).
- keeping conversations and tasks short. Theia AI recommends this even for non-local LLMs and provides tools such as Task Context and Chat Summary. So, it is a good idea to follow Theia AI's advice and use these features regularly.
- defining specialized agents. It is very easy to define a new agent with its custom prompt and tools in Theia AI. If we can identify a repeating task that needs several specialized tools, it is a good idea to define a specialized agent with this specialized toolset. In particular regarding the support for MCP servers, it might be tempting to start five or more MCP servers and just throw all the available tools into the Architect or Coder agent's prompt. This is a bad idea, though, because each tool's definition is added to the system prompt and thus, consumes a part of the context window.
Note that unloading/loading models is rather expensive as well and usually takes up to several seconds. And in Ollama, even changing the context window size causes a model reload. Therefore, as VRAM is usually limited, it is a good idea to stick to one or two models that can fit into the available memory, and not change context window sizes too often.
Organizational Measures
Even with these considerations regarding the context length, Local LLMs will always be slower than their cloud counterparts.
Therefore, we should compensate for this at the organizational level by adjusting the way we work; for example, while waiting for the LLM to complete a task,
- we could start to write and edit prompts for the next features
- we can review the previous task contexts or code modifications and adjust them
- we can do other things in parallel, like go to lunch, grab a coffee, go to a meeting, etc., and let the LLM finish its work while we are away.
Considerations Regarding Accuracy
As mentioned in part 1, local LLMs are usually quantized (which means basically: rounded) so that weights-or parameters-consume less memory. Therefore, a model can have a lower accuracy. The symptom for this is that the agent does not do the correct thing, or does not use the correct arguments when calling a tool.
In my experience, analyzing the reasoning/thinking content and checking the actual tool calls an agent makes, is a good way to determine what goes wrong. Depending on the results of such an analysis
- we can modify the prompt; for example by giving more details, more examples, or by emphasizing important things the model needs to consider
- we can modify the implementation of the provided tools. This, of course, requires building a custom version of the Theia IDE or the affected MCP server. But if a tool call regularly fails, because the LLM does not get the arguments 100% correct, but we could mitigate for these errors in the tool implementation, it might be beneficial to invest in making the tool implementation more robust.
- we can provide more specific tools; for example, Theia AI only provides general file modification tools, such as writeFileReplacements. If you work mostly with TypeScript code, for example, it might be a better approach to implement and use a specialized TypeScript file modification tool that can automatically take care of linting, formatting, etc. on the fly.
Considerations Regarding Complexity
During my experiments, I have tried to give the agent more complex tasks to work on and let it run overnight. This failed however, because sooner or later, the agent will be unable to continue due to the limited context size; it starts forgetting the beginning of the conversation and thus, its primary objective.
One way to overcome this limitation is to split complex tasks into several smaller, lower-level ones. Starting with version 1.63.0, Theia AI supports agent-to-agent delegation. Based on this idea, we could implement a special Orchestrator agent (or a more programmatic workflow) that is capable to split complex tasks into a series of simpler ones. These simpler tasks could then be delegated to specialized agents (refined versions of Coder, AppTester, etc.) one by one. This would have the advantage that each step could start with a fresh, empty context window, thus following the considerations regarding context discussed above.
This is something that would need to be implemented and experimented with.
Odds and Ends
This blog article has presented my experiences and considerations about using local LLMs with Theia AI.
Several topics have only been touched slightly, or not at all, and are subject of further inspection and experimentation:
- Until recently, I had considered Ollama too slow for code completion, mostly because the TTFT (time to first token) is usually rather high. But recently, I have found that at least with the model zdolny/qwen3-coder58k-tools:latest, the response time feels okay. So, I will start experimenting with this and some other models for code completion.
- Also, Ollama supports fill-in-the-middle completion. This means that the completion API does not only support providing a prefix, but also a suffix as input. This API is currently not supported by Theia AI directly. The Code Completion Agent in Theia usually provides the prefix and suffix context as part of the user prompt. So Theia AI would have to be enhanced to support the fill-in-the-middle completion feature natively. And it needs to be determined whether this will also help to improve performance and accuracy.
- Next, there are multiple approaches regarding optimizing and fine-tuning models for better accuracy and performance. There are several strategies, such as Quantization, Knowledge Distillation, Reinforcement Learning, and Model Fine Tuning which can be used to make models more accurate and performant for one's personal use cases. The Unsloth and MLX projects, for example, aim at providing optimized, local options to perform these tasks.
- Finally, regarding Apple Silicon Processors in particular, there are two alternatives to boost performance, if they were supported:
- CoreML is a proprietary Apple framework to use the native Apple Neural Engine (which would provide another performance boost, if an LLM could run fully on it). The bad news is that at the moment, it seems that using the Apple Neural Engine is currently limited by several factors. Therefore, there are no prospects of running a heavier LLM, such as gpt-oss:20b, on the ANE, at the moment.
- MLX is an open framework, also developed by Apple, that runs very efficiently on Apple Silicon processors using a hybrid approach to combine CPU, GPU, and Apple Neural Engine resources. Yet, there is still very limited support available to run LLMs in MLX format. But at least, there are several projects and enhancements in development:
- there is a Pull Request in development to add MLX support to Ollama, which is the basis for using the Neural Engine
- other projects, such as LM Studio, swama, mlx-lm and others support models in the optimized MLX format, but in my experiments, tool call processing was unstable, unfortunately.
Outlook
The evolution of running LLMs locally and using them for agentic development in Theia AI has been moving fast recently. The progress made in 2025 alone suggests that LLMs running locally will continue to get better and better over time:
- better models keep appearing: from deepseek-r1 to qwen3 and gpt-oss, we can be excited about what will come next
- context management is getting better: every other week, we can observe discussions around enhancing or using the context window more effectively in one way or another: the Model-Context-Procol, giving LLMs some form of persistent memory, choosing more optimal representations of data, for example by using TOON, utilizing more intelligent context compression techniques, to name just a few.
- hardware is becoming better, cheaper, and more available; I have performed my experiments with a 5 year old processor (Apple M1 Max) and I have already achieved acceptable results. Even today's processors are already much better, and there is more to come in the future
- software is becoming better: Ollama is being actively developed and enhanced, and Microsoft has recently published BitNet, an engine to support 1-bit LLMs, etc.
We can be excited to see what 2026 will bring…
- Details
- Category: Eclipse
This blog article is an extended version of a talk I gave at TheiaCon 2025. The talk has covered my experiences with Ollama and Theia AI in the previous months.
What is Ollama?
Ollama is an OpenSource project which aims at making it possible to run Large Language Models (LLMs) locally on your own hardware with a docker-like experience. This means that, as long as your hardware is supported, it is detected and used with no further configuration.
Advantages
Running LLMs locally has several advantages:
- Unlimited tokens: you only pay for the power you are consuming and the hardware if you do not already own it.
- Full confidentiality and privacy: the data (code, prompts, etc.) never leaves your network. You do not have to worry about providers using your confidential data to train their models.
- Custom models: You have the option to choose from a large number of pre-configured models, or you can download and import new models, for example, from huggingface. Or you can take a model and tweak it or fine-tune it to your specific needs.
- Vendor neutrality: It does not matter who wins the AI race in a few months, you will always be able to run the model you are used to locally.
- Offline: You can use a local LLM on a suitable laptop even when traveling, for example by train or on the plane. No Internet connection required. (A power outlet might be good, though...)
Disadvantages
Of course, all of this also comes at a cost. The most important disadvantages are:
- Size limitations: Both the model size (number of parameters) and context size are heavily limited by the available VRAM.
- Quantization: As a compromise to allow for larger models or contexts, quantization is used to sacrifice weight precision. In other words, a model with quantized parameters can fit more parameters in the same amount of memory. This comes at a cost of lower inference accuracy as we will see further below.
Until recently, the list of disadvantages has included that there was no support for local multimodal models. So, reasoning about images, video, audio, etc. was not possible. But that has changed last week, when ollama 0.12.7 was released along with locally runnable qwen3-vl model variants.
Development in 2025
A lot has happened in 2025 alone. At the beginning of 2025, there was neither a good local LLM for agentic use (especially reasoning and tool calling was not really usable) and also the support for Ollama in Theia AI was limited.
But since then, in the last nine months:
- Ollama 0.9.0 has added support for reasoning/thinking and streaming tool calling
- More powerful models have been released (deepseek-r1, qwen3, gpt-oss, etc.)
- Ollama support in Theia AI has seen a major improvement
With the combination of these changes, it is now very well possible to use Theia AI agents backed by local models.
Getting Started
To get started with Ollama, you need to follow these steps:
- Download and install the most recent version of Ollama. Be sure to regularly check for updates, as with every release of Ollama, new models, new features, and performance improvements are implemented.
- Start Ollama using a command line like this:
OLLAMA_NEW_ESTIMATES="1" OLLAMA_FLASH_ATTENTION="1" OLLAMA_KV_CACHE_TYPE="q8_0" ollama serve
Keep an eye open for the Ollama release changelogs, as the environment settings can change over time. Make sure to enable and experiment with new features. - Download a model using
ollama pull gpt-oss:20b - Configure the model in Theia AI by adding it to the Ollama settings under Settings > AI Features > Ollama
- Finally, as described in my previous blog post, you need to add request settings for the Ollama models in the settings.json file to adjust the context window size (num_ctx), as the default context window in Ollama is not suitable for agentic usage.
Experiments
As a preparation for TheiaCon, I have conducted several non-scientific experiments on my MacBook Pro M1 Max with 64GB of RAM. Note that this is a 5-year-old processor.
The task I gave the LLM was to locate and fix a small bug: A few months ago, I had created Ciddle - a Daily City Riddle, a daily geographical quiz, mostly written in NestJS and React using Theia AI. In this quiz, the user has to guess a city. After some initial guesses, the letters of the city name are partially revealed as a hint, while keeping some letters masked with underscores. As it turned out, this masking algorithm had a bug related to a regular expression not being Unicode-friendly: it matched only ASCII letters, but not special characters, such as é. So special characters would never be masked with underscores.
Therefore, I wrote a prompt explaining the issue and asked Theia AI to identify the bug and fix it. I followed the process described in this post:
- I asked the Architect agent to analyze the bug and plan for a fix
- once without giving the agent the file containing the bug, so the agent needs to analyze and crawl the workspace to locate the bug
- once with giving the agent the file containing the bug using the "add path to context" feature of Theia AI
- I asked Theia AI to summarize the chat into a task context
- I asked Coder to implement the task (in agent mode, so it directly changes files, runs tasks, writes tests, etc.)
- once with the unedited summary (which contained instructions to create a test case)
- once with the summary with all references to an automated unit test removed, so the agent would only fix the actual bug, but not write any tests for it
The table below shows the comparison of different models and settings:
| Model | Architect | Architect (with file path provided) | Summarize | Coder (fix and create test) | Coder (fix only) |
| gpt-oss:20b | |||||
| - w/ num_ctx = 16k | 175s | 33s | 32s | 2.5m (3) | 43s |
| - w/ num_ctx = 128k | 70s | 50s | 32s | 6m | 56s |
| qwen3-14b - w/ num_ctx = 40k |
(1) | 143s | 83s | (4) | (4) |
| qwen3-coder:30b - w/ num_ctx = 128k |
(2) | (2) | 64s | 21m (3) | 13m |
| gpt-oss:120b-cloud | 39s | 16s | 10s | 90s (5) | 38s |
(1) without file path to fix, the wrong file and bugfix location is identified
(2) with or without provided path to fix, qwen3-coder "Architect" agent runs in circles trying to apply fixes instead of providing an implementation plan
(3) implemented fix correctly, but did not write a test case, although instructed to do so.
(4) stops in the middle of the process without any output
(5) in one test, gpt-oss:120b-cloud did not manage to get the test file right and failed when the hourly usage limit was exceeded
Observations
I have performed multiple experiments. The table reports more or less the best case times. As usual when working with LLMs, the results are not always deterministic. But, in general, if the output is similar for a given model, the processing time is also the same within a few seconds, so the table above shows more or less typical results for the case that the outcome was acceptable, if this was possible.
In general, I have achieved the best results with gpt-oss:20b with a context window of 128k tokens (the maximum for this model). A smaller context window can result in faster response times, but at the risk of not performing the task completely; for example, when running with 16k context, the Coder agent would fix the bug, but not provide a test, even though the task context contained this instruction.
Also, in my first experiments, the TypeScript/Jest configuration contained an error which caused the model (even with 128k context) to run around in circles for 20 minutes and eventually deleting the test again before finishing its process.
The other two local models, I used in the tests, qwen3:14b and qwen3-coder:30b were able to perform some of the agentic tasks, but usually at a lower performance and even failing in some scenarios.
Besides the models listed in the table above, I have also tried a few other models that were popular in the Ollama model repository, such as granite4:small-h and gemma3:27b. But they either had a similar behavior as qwen3:14b, so they just stopped at some point without any output, or they did not use the tools provided and just replied with a general answer.
Also note, that some tools (such as deepseek-r1) do not support tool calling in their local variants (yet...?). There are some variants of common models that are modified by users to support tool calling in theory, but in practice the tool calls are either not properly detected by ollama, or the provided tools are not used at all.
Finally, just for comparison, I have also used the recently released Ollama cloud model feature to run the same tasks with gpt-oss:120b-cloud. As expected, the performance is much better than with local models, but at the same time, the gpt-oss:120b-cloud model also began to run around in circles once. So even that is not perfect in some cases.
To summarize, the best model for local agentic development with Ollama is currently gpt-oss:20b. In case everything works, it is surprisingly fast even with my 5 year old hardware. But, if something goes wrong, it usually goes fatally wrong, and the model will entangle itself in endless considerations and fruitless attempts to fix the situation.
Stay tuned for the second part of this article, where I will describe the conclusions I draw from my experiences and experiments, discuss consequences, and provide a look into the future of local LLMs in the context of agentic software development.
- Details
- Category: Eclipse
With the inclusion of PR 15795, the Theia 1.63.0 release that has been built today now supports Ollama release 0.9.0 which has introduced several improvements, which are now also available in Theia AI. This post highlights those improvements and gives a few general hints on how to improve your experience with Ollama in Theia AI.
Streaming Tool Calling
One of the most interesting features of the Ollama 0.9.0 release is support for streaming tool calling in the API. This makes working with the LLM much more convenient, as you can follow the output and tool calls during the generation. As a side effect, this also boosts output quality especially for tool calls for the models that support them. See this article for more information on this.
Starting with Theia 1.63.0, Theia AI uses the new streaming API including tool calling so that Ollama models now behave more like models from other providers, such as OpenAI, Google, and Anthropic.
Explicit Thinking Markup
Thinking or reasoning in LLMs have received much attention in the recent months, especially since deepseek-r1 was announced. While Ollama did support reasoning models for several months now, the reasoning steps have always been part of the actually generated response and could only be extracted by looking for <think>...</think> or similar markup generated by the LLM.
Ollama 0.9.0 has added support for distinguishing reasoning output and actual output on the API level. The new Ollama provider in Theia propagates this feature so collapsible reasoning blocks are rendered on the UI level.
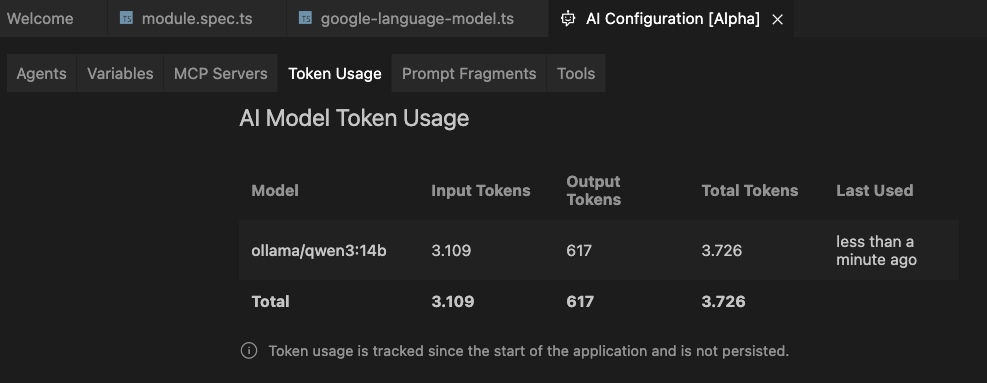
Token Usage Reporting for Ollama
Of course, as you are running Ollama most likely on your own hardware, the token usage report is not as crucial as with paid third-party services. But still, it might be at least interesting to know how many tokens you are using with your own Ollama server.
The new Ollama provider released in Theia 1.63.0 now reports token usage statistics in the AI Configuration View in the tab Token Usage.
Support for Images in the Chat Context
Theia 1.63.0 has added preliminary support for images in the Theia AI chat. Using the + button in the AI Chat, it is now possible to add images which are passed to the LLM as part of the context. This is also supported for Ollama LLMs; but note that not many models support images. One example is the llava model.
If unsure, you can use the ollama show command in a terminal to check for the image capability of a model.
Configuration and Usage Hints
Using an Ollama server running on usually limited local hardware is most likely no competition for paid 3rd party services. But maybe the absence of token limits and privacy concerns are still sometimes more important than performance. To make Ollama models at least a bit more usable in practice, it is important to tweak the configuration to adapt it to your hardware and needs. This section gives some hints about possible optimizations. Note: these settings have been tested with an Apple Silicon M1 Max system; for other hardware, please refer to other blog articles that discuss Ollama optimizations.
Ollama Server Settings
To reduce the memory footprint of the request context, set these environment variables before executing ollama serve:
-
OLLAMA_FLASH_ATTENTION=1 -
OLLAMA_KV_CACHE_TYPE="q8_0"
See the Ollama FAQ for more details.
Theia AI Considerations
We might be tempted to download and use different models for different Theia AI agents, e.g. a universal model, such as qwen3 for universal tasks, and more specialized models, such as codellama for code-centric tasks like the Coder or Code Completion agent. However, we need to consider that each model that is loaded at the same time uses a lot of memory so that Ollama might decide to unload models that are not used at the moment. And since unloading and loading models takes some time, performance decreases if you use too many models.
Therefore, it is usually a better idea to use fewer models, for example one smaller model for tasks that should not take too long (such as Code Completion and Chat Session Naming), and one larger model for complex tasks (such as Architect or Coder agents). The best results can be achieved if both models fit in the available VRAM so that no model loading/unloading occurs.
Theia AI Request Settings
One important thing to note is that Ollama per default uses a context window of just 2048 tokens. Most tasks in Theia AI will not provide satisfactory results with this default. Therefore it is important to adjust the request settings and to increase the num_ctx parameter. As with the model size discussed before, the context size should be set to match the agent and task because a larger context leads to results with higher quality but longer runtimes. Therefore, it is important to play around with the settings and find the optimal settings matching the used models and the use case.
These hints provide some initial help:
- Check the Ollama server logs and keep an eye out for messages like this:
"truncating input prompt" limit=2048 prompt=4313 keep=4 new=1024
This message indicates that the input prompt exceeds the required context length, so the input prompt will be truncated (which will usually lead to bad answers from the model, as it will forget half of the question you were asking...) - Also during the process of loading a model, if you see a message like
llama_context: n_ctx_per_seq (2048) < n_ctx_train (40960)
this indicates that the current num_ctx (2048) setting is smaller than the context window the model was trained with (40960).
Alternatively, you can also useollama showto check for the context length property of the model. (Do not confuse the context length property, which is the theoretical maximum context length for this model with the num_ctx parameter, which is the actual context length used in requests).
To adjust the num_ctx parameter in Theia, go to Settings > AI Features > Model Settings and follow the link to open the settings.json file in the editor.
Then create a new setting like this:
"ai-features.modelSettings.requestSettings": [
{
  "scope": {
    "agentId": "Coder",
    "modelId": "ollama/qwen3:14b",
    "providerId": "ollama"
  },
  "requestSettings": { "num_ctx": 40960 }
}]
In the scope part, you declare the provider, model, and agent to which apply the settings. You can leave out either key to apply the setting for all providers, agents, and/or models, respectively.
In the same way you can adjust and play around with the other Ollama parameters, such as temperature, top_k, etc.
- Details
- Category: Eclipse
This article is part of a series to help newcomers to get started with Eclipse Theia development by setting up a local docker-based development environment for Theia.
In the previous article, we have created our first Eclipse Theia extension, changed some code, and used the debugger to set and hit a breakpoint in the frontend.
As a next step, I wanted to demonstrate how to debug the backend. So the best way, I thought, was to create a backend service to provide the "Hello World" message instead of having it hard-coded in the frontend.
As described in the Theia Documentation, a Theia Extension can add logic to both the frontend and the backend. To facilitate communication between both components, any protocol could be used; the backend could register and open its own endpoint and the frontend could access it. But, of course, Theia already provides a JSON-RPC API which can be used quite easily.
All of the code below is available in the hello-world branch of my GitHub repository.
Let’s start by specifying a service which can provide our "Hello World“ message. Since it needs to be known by both the backend and the frontend, we put it in hello-world/src/common/hello-world.ts:
export namespace HelloWorldConstants {
    export const SERVICE_PATH = '/services/hello-world';
}

export const HelloWorld = Symbol("HelloWorld")

export interface HelloWorld {
    getHelloString(): Promise<string>;
}
This code defines an interface for our very simple service, a Symbol for it (which is required by the dependency injection framework), and a constant for the service path at which we want to publish/consume our service. Note that the service returns a Promise<string> instead of a plain string. Since we are dealing with a remote service, using promises makes the code behave better, because we can consume the result asynchronously as we receive it, as we will see below.
The service implementation in the backend goes into hello-world/src/node/hello-world-impl.ts and is as simple as:
@injectable()
export class HelloWorldImpl implements HelloWorld {
    getHelloString(): Promise<string> {
        return Promise.resolve("Hello from the backend!");
    }
}
We need to annotate the class with @injectable() because we want to use it as an injection binding in the backend module later.
Now, that we have the service and its implementation, let’s use it from the CommandContribution in the frontend (I am only showing the changed class HelloWorldCommandContribution):
@injectable()
export class HelloWorldCommandContribution implements CommandContribution {

    constructor(
        @inject(MessageService) private readonly messageService: MessageService,
        @inject(HelloWorld) private readonly helloWorldService: HelloWorld
    ) { }

    registerCommands(registry: CommandRegistry): void {
        registry.registerCommand(HelloWorldCommand, {
            execute: async () => {
                this.helloWorldService.getHelloString().then(helloString => this.messageService.info(helloString))
            }
        });
    }
}
Note that we have added an injection for the HelloWorld service, and in the execute logic, we chain the Promise with the callback logic via the then() function. So, we request the helloString asynchronously, and as soon as it is received (and the Promise is resolved), we call the messageService to show it.
The next step is to tell the dependency injection framework in the frontend how to provide the HelloWorld service we want to inject and use in the HelloWorldCommandContribution. To do this, we extend the existing hello-world-frontend-module.ts as follows:
export default new ContainerModule(bind => {
    // add your contribution bindings here
    bind(CommandContribution).to(HelloWorldCommandContribution);
    bind(MenuContribution).to(HelloWorldMenuContribution);
    bind(HelloWorld).toDynamicValue(ctx => {
        const connection = ctx.container.get(WebSocketConnectionProvider);
        return connection.createProxy<HelloWorld>(HelloWorldConstants.SERVICE_PATH);
    }).inSingletonScope();
});
What we do here is to create a proxy implementation of the HelloWorld interface that is backed by a WebSocketConnectionProvider, which in turn is instructed to handle requests via the SERVICE_PATH path. Every method call on the proxy is encoded in a JSON-RPC request and sent to the backend via the given SERVICE_PATH.
At the backend-side in hello-world/src/node/hello-world-backend-module.ts, we create and register the peer instance:
export default new ContainerModule(bind => {
    bind(HelloWorld).to(HelloWorldImpl).inSingletonScope();
    bind(ConnectionHandler).toDynamicValue(ctx =>
        new JsonRpcConnectionHandler<HelloWorld>(HelloWorldConstants.SERVICE_PATH, (_client: any) => ctx.container.get<HelloWorld>(HelloWorld))
    ).inSingletonScope()
})
First, we bind the HelloWorld service to its actual implementation HelloWorldImpl. This is not strictly required for our use case, but would make sense as soon as HelloWorldImpl wanted to access other services which are provided via injection.
Next, we create the JsonRpcConnectionHandler which is the counterpart of the WebSocketConnectionProvider above. Like in the frontend, we bind the WebSocketConnectionProvider to the SERVICE_PATH. All incoming method invocation requests are then forwarded to a HelloWorldServiceImpl instance. (Note that there is also a _client argument. We don’t use it here, but we could use it to implement a bi-directional protocol in which the client can be called back by the server).
Now the only thing left to do is to register the backend ContainerModule configuration in the package.json file
  "theiaExtensions": [
    {
      "frontend": "lib/browser/hello-world-frontend-module",
      "backend": "lib/node/hello-world-backend-module"
    }
  ]
and we are all set. When we launch first the backend, then the frontend in the browser and click on the Say Hello menu item, the new message will appear: Hello from the backend!
Debugging
Backend debugging is easier than frontend debugging described in the previous article, because we don’t need to deal with a browser debugging engine. The VS Code debugger can natively attach to the backend process and the yeoman code generator already took care of creating a launch configuration for us in launch.json. So, we can just place a breakpoint in the getHelloString() method in the HelloWorldImpl class, launch the Launch Backend configuration, and when we click the menu item in the frontend, we see that the breakpoint is hit.
Besides plain breakpoints, VS Code also supports conditional breakpoints, breakpoints with hit counts, and logpoints. The latter are really useful when trying to find out which part of code is called when. Using a logpoint, you can inject an arbitrary log statement that is executed without the debugger suspending the execution.
To try it out, let’s add a logpoint in the node_modules/@theia/core/src/common/messaging/proxy-factory.ts at line 156 in the onRequest method by right-clicking on the line number and selecting Add Logpoint .... As the expression we enter Request: {method}. The expression inside the curly braces is evaluated when the breakpoint is hit.
Now, we can play around with the frontend and can see the requests that are issues to the backend:
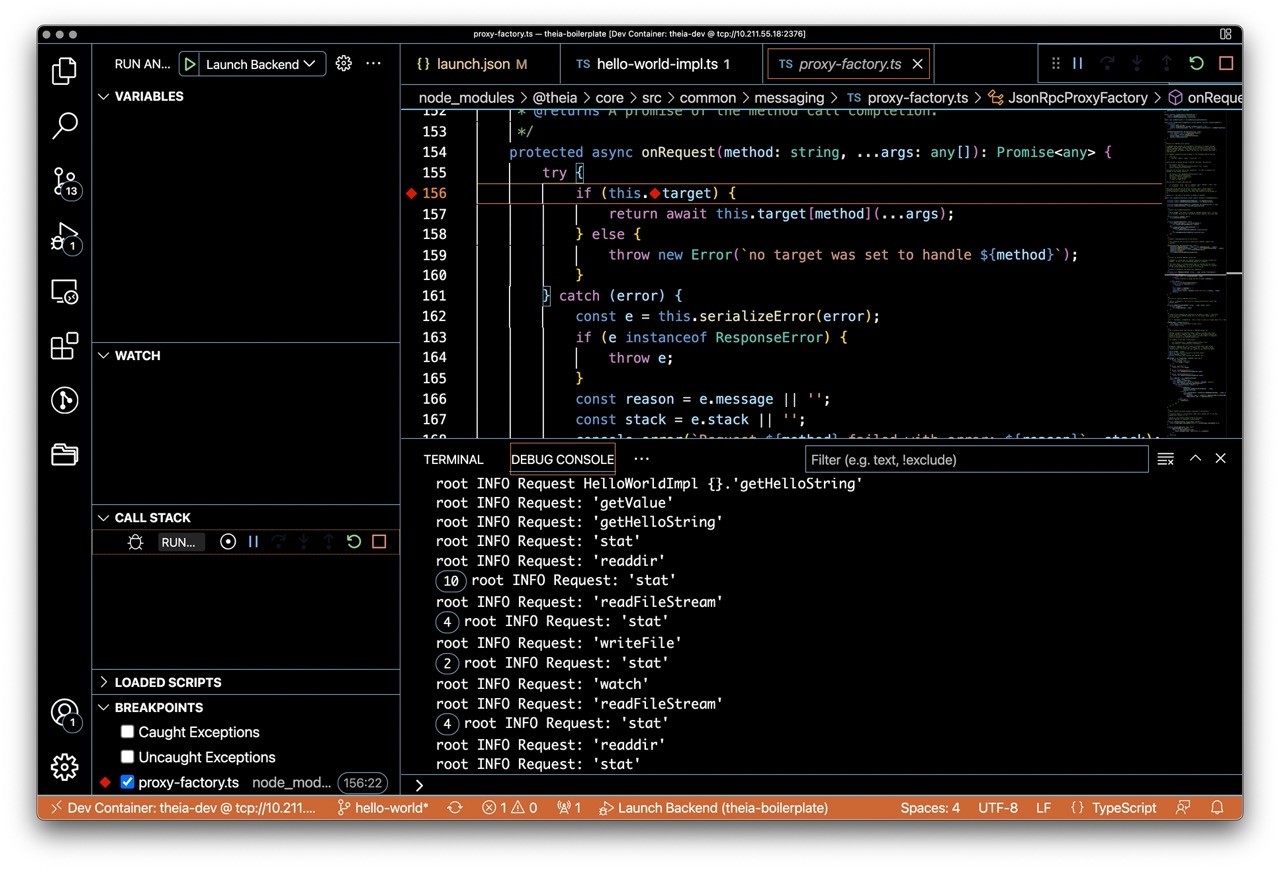
Note: At the time of writing this, there is a bug in the VS Code JavaScript debugger that prevents logpoints from working correctly with Theia. This bug is already fixed when installing the vscode-js-debug nightly as described here, and will hopefully be resolved soon in the next VS Code release.
And with this, I close today’s article. Have fun playing around with logpoints.
- Details
- Category: Eclipse