This article is part of a series to help newcomers to get started with Eclipse Theia development by setting up a local docker-based development environment for Theia.
In the previous article, we have created our first Eclipse Theia extension, changed some code, and used the debugger to set and hit a breakpoint in the frontend.
As a next step, I wanted to demonstrate how to debug the backend. So the best way, I thought, was to create a backend service to provide the "Hello World" message instead of having it hard-coded in the frontend.
As described in the Theia Documentation, a Theia Extension can add logic to both the frontend and the backend. To facilitate communication between both components, any protocol could be used; the backend could register and open its own endpoint and the frontend could access it. But, of course, Theia already provides a JSON-RPC API which can be used quite easily.
All of the code below is available in the hello-world branch of my GitHub repository.
Let’s start by specifying a service which can provide our "Hello World“ message. Since it needs to be known by both the backend and the frontend, we put it in hello-world/src/common/hello-world.ts:
export namespace HelloWorldConstants {
    export const SERVICE_PATH = '/services/hello-world';
}

export const HelloWorld = Symbol("HelloWorld")

export interface HelloWorld {
    getHelloString(): Promise<string>;
}
This code defines an interface for our very simple service, a Symbol for it (which is required by the dependency injection framework), and a constant for the service path at which we want to publish/consume our service. Note that the service returns a Promise<string> instead of a plain string. Since we are dealing with a remote service, using promises makes the code behave better, because we can consume the result asynchronously as we receive it, as we will see below.
The service implementation in the backend goes into hello-world/src/node/hello-world-impl.ts and is as simple as:
@injectable()
export class HelloWorldImpl implements HelloWorld {
    getHelloString(): Promise<string> {
        return Promise.resolve("Hello from the backend!");
    }
}
We need to annotate the class with @injectable() because we want to use it as an injection binding in the backend module later.
Now, that we have the service and its implementation, let’s use it from the CommandContribution in the frontend (I am only showing the changed class HelloWorldCommandContribution):
@injectable()
export class HelloWorldCommandContribution implements CommandContribution {

    constructor(
        @inject(MessageService) private readonly messageService: MessageService,
        @inject(HelloWorld) private readonly helloWorldService: HelloWorld
    ) { }

    registerCommands(registry: CommandRegistry): void {
        registry.registerCommand(HelloWorldCommand, {
            execute: async () => {
                this.helloWorldService.getHelloString().then(helloString => this.messageService.info(helloString))
            }
        });
    }
}
Note that we have added an injection for the HelloWorld service, and in the execute logic, we chain the Promise with the callback logic via the then() function. So, we request the helloString asynchronously, and as soon as it is received (and the Promise is resolved), we call the messageService to show it.
The next step is to tell the dependency injection framework in the frontend how to provide the HelloWorld service we want to inject and use in the HelloWorldCommandContribution. To do this, we extend the existing hello-world-frontend-module.ts as follows:
export default new ContainerModule(bind => {
    // add your contribution bindings here
    bind(CommandContribution).to(HelloWorldCommandContribution);
    bind(MenuContribution).to(HelloWorldMenuContribution);
    bind(HelloWorld).toDynamicValue(ctx => {
        const connection = ctx.container.get(WebSocketConnectionProvider);
        return connection.createProxy<HelloWorld>(HelloWorldConstants.SERVICE_PATH);
    }).inSingletonScope();
});
What we do here is to create a proxy implementation of the HelloWorld interface that is backed by a WebSocketConnectionProvider, which in turn is instructed to handle requests via the SERVICE_PATH path. Every method call on the proxy is encoded in a JSON-RPC request and sent to the backend via the given SERVICE_PATH.
At the backend-side in hello-world/src/node/hello-world-backend-module.ts, we create and register the peer instance:
export default new ContainerModule(bind => {
    bind(HelloWorld).to(HelloWorldImpl).inSingletonScope();
    bind(ConnectionHandler).toDynamicValue(ctx =>
        new JsonRpcConnectionHandler<HelloWorld>(HelloWorldConstants.SERVICE_PATH, (_client: any) => ctx.container.get<HelloWorld>(HelloWorld))
    ).inSingletonScope()
})
First, we bind the HelloWorld service to its actual implementation HelloWorldImpl. This is not strictly required for our use case, but would make sense as soon as HelloWorldImpl wanted to access other services which are provided via injection.
Next, we create the JsonRpcConnectionHandler which is the counterpart of the WebSocketConnectionProvider above. Like in the frontend, we bind the WebSocketConnectionProvider to the SERVICE_PATH. All incoming method invocation requests are then forwarded to a HelloWorldServiceImpl instance. (Note that there is also a _client argument. We don’t use it here, but we could use it to implement a bi-directional protocol in which the client can be called back by the server).
Now the only thing left to do is to register the backend ContainerModule configuration in the package.json file
  "theiaExtensions": [
    {
      "frontend": "lib/browser/hello-world-frontend-module",
      "backend": "lib/node/hello-world-backend-module"
    }
  ]
and we are all set. When we launch first the backend, then the frontend in the browser and click on the Say Hello menu item, the new message will appear: Hello from the backend!
Debugging
Backend debugging is easier than frontend debugging described in the previous article, because we don’t need to deal with a browser debugging engine. The VS Code debugger can natively attach to the backend process and the yeoman code generator already took care of creating a launch configuration for us in launch.json. So, we can just place a breakpoint in the getHelloString() method in the HelloWorldImpl class, launch the Launch Backend configuration, and when we click the menu item in the frontend, we see that the breakpoint is hit.
Besides plain breakpoints, VS Code also supports conditional breakpoints, breakpoints with hit counts, and logpoints. The latter are really useful when trying to find out which part of code is called when. Using a logpoint, you can inject an arbitrary log statement that is executed without the debugger suspending the execution.
To try it out, let’s add a logpoint in the node_modules/@theia/core/src/common/messaging/proxy-factory.ts at line 156 in the onRequest method by right-clicking on the line number and selecting Add Logpoint .... As the expression we enter Request: {method}. The expression inside the curly braces is evaluated when the breakpoint is hit.
Now, we can play around with the frontend and can see the requests that are issues to the backend:
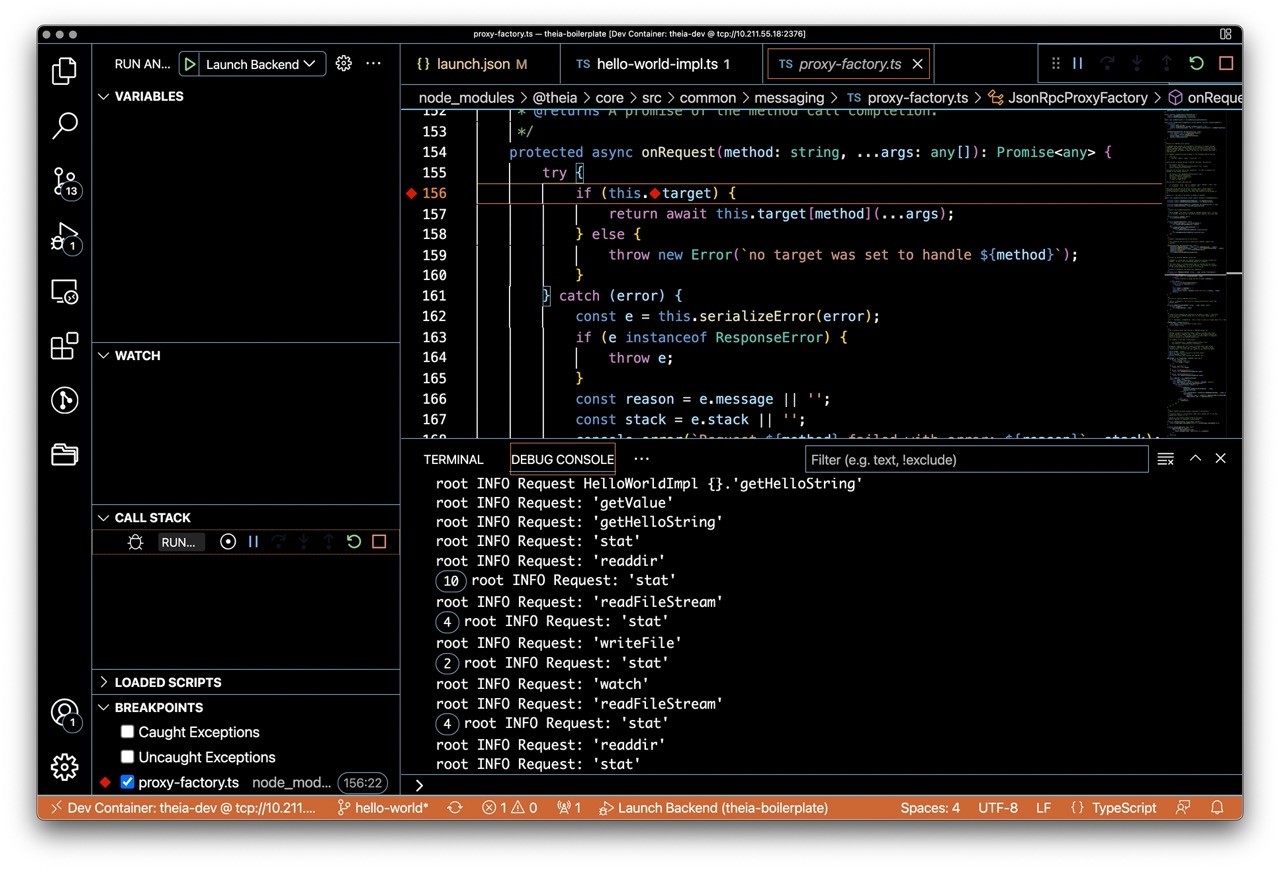
Note: At the time of writing this, there is a bug in the VS Code JavaScript debugger that prevents logpoints from working correctly with Theia. This bug is already fixed when installing the vscode-js-debug nightly as described here, and will hopefully be resolved soon in the next VS Code release.
And with this, I close today’s article. Have fun playing around with logpoints.