At EclipseCon NA 2014 Project Oomph has created some buzz. Project Oomph by Eike and Ed is an attempt of making contributing to an Eclipse project dead easy by providing an automated setup process for each project.
Setting up a workspace with the correct tooling, target platform, imported projects and baseline is a matter of just downloading and starting a setup application, selecting the desired project, clicking ok, and getting some coffee (the latter is optional and not included in the setup tool package ...). Read more here.
For some time now, I have been looking for an easy way to manage my own bunch of Eclipse installations. For example, I have one IDE for CDO development, one IDE for one customer who works with a Servets-based Tomcat application, one IDE for another customer who implements an internal IDE for C development, one IDE for my own sandbox-projects (which lead to stuff like CDO-Xtext), and in my free time, I am typesetting music from time to time using the Eclipse-based Lilypond IDE Elysium.
The problem is that every time a new release (or milestone) comes out, I have to update all of these installations, which has been (until now) quite cumbersome, because automatically updating the installations while preserving the correct set of needed plugins and features just did not work well.
But with project Oomph, I have started to create setup models for all my different installations and it really works well while being simple at the same time: installations based on Project Oomph will update installed features as updates become available while keeping the set of features intact. (Note: it is actually the p2 director that does all the magic, and there is other means to control the p2 director to achieve my requirements of installing a workspace with a given set of features. It is just that Project Oomph provides a very nice and clean way to model the desired results).
This guide describes how to set up a workspace for the setup model tooling and how to get started in general.
So after setting up the workspace, create a new empty project and create a new empty setup model. The first thing to add is a p2 director task. Under this task, you can specify the Installation Units (IUs) to install into your IDE and the repositories to install from.
Unfortunately, there is no way to browse and select IUs from the repositories directly. But I have already opened an enhancement request for this. Until this is implemented, you can, e.g., work with the b3 tooling and create a temporary aggregation model, add validation repositories, and use the repository browser to identify and copy-paste IU IDs.
When the p2 task is configured, you can set up any other tasks you need (e.g., clone git repositories, import projects, configure a baseline, adjust preferences, etc.).
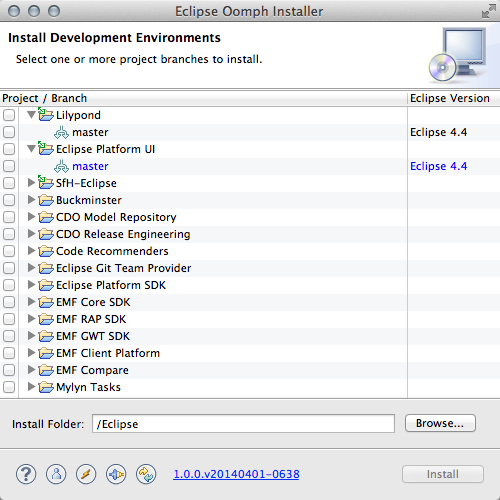
To use you setup model, just copy it into the main directory of the Setup application (under MacOS X you have to use Setup.app/Contents/MacOS/). When you start the setup tool next time, your own models are listed at the top of the projects list and you can install them from there.
Also, by creating or modifying your personalized setup model addition (on Mac, this is located under ~/.eclipse/org.eclipse.emf.cdo.releng.setup/setup-eclipse.xmi), you can set your favorite preferences or add your favorite features once in there and have them automatically applied to all of your installations. For example, for Mac OS X, I very much like the Mac OS X workspace badge plugin. So I included it in my setup-eclipse.xmi and at the same time set its configuration option to the name of the installed workspace:
Instead of editing the setup-eclipse.xmi by hand, you can also use these two buttons:

(1) will open the setup-eclipse.xmi in the setup model editor and (2) will open the preferences dialog and add all changes you make to the model.
To give an example for a more complex setup model, I have followed the instructions on the Eclipse Platform UI workspace setup guide. This guide lists several steps to setup and configure your workspace so you can contribute to the Platform UI project. Instead of following this guide, you can now use this setup model and the Oomph installer to get started in no time.
(Disclaimer: I have created this setup model just for my own needs. Please consider this unofficial and unmaintained for now. In particular, only the setup for master branch development is currently available. But if someone wants to pick up this model and create an official version, feel free to go ahead and do so!)
Summary: Oomph is cool. It makes installation and maintenance of eclipse installations a breeze.
The Oomph project is currently located in the CDO.releng component but is currently proposed as a separate, Eclipse Tools project. If all goes well, the easter bunny will bring us this project and hopefully a lot more useful features :-).